

Table of Contents
- Assess Your Space and Prioritise Essentials
- Nursery Closet Organisation Ideas
- Small Nursery Storage Hacks for Baby Gear
- Baby Clothes Storage Solutions
- Changing Station and Diaper Organisation
- Safety-First Storage Anchoring
- Budget-Friendly DIY Storage Hacks
- Long-Term Scalability and Inventory Management
- Frequently Asked Questions
Last Updated: September 3, 2026
Assess Your Space and Prioritise Essentials
Before buying storage, measure your nursery and sketch a rough floor plan. Note windows, radiators, and outlets that limit furniture placement. This prevents buying storage that won't fit.
List everything your baby actually needs in the nursery daily: nappies, wipes, a few clothes changes, bedding, and sleep aids. Everything else, spare bedding, seasonal clothes, belongs elsewhere. Parents who prioritise ruthlessly end up with functional nurseries because they've eliminated unnecessary clutter from the start. The goal is storing only what needs to be there, not storing everything in one room.
Nursery Closet Organisation Ideas
Your nursery closet is prime real estate. A properly organised closet transforms the entire nursery experience.
Hanging Rails and Vertical Space
Install a second, lower rail specifically for baby clothes so your child can eventually reach their own items. Hanging organisers with multiple pockets store socks, hats, and accessories efficiently. Use shelf dividers to prevent folded clothes from avalanching when you pull one item. A tension rod across the closet's depth creates two separate hanging zones, one for seasonal clothes, one for current-season items.
Shelf Dividers and Stacking Systems
Adjustable shelf dividers transform a shelf from a pile into an organised system. Group similar items together: blankets in one section, spare sheets in another. Clear plastic stackable boxes let you see contents without opening them. Label each box and stack vertically to maximise space rather than spreading items across multiple shelves.
Small Nursery Storage Hacks for Baby Gear
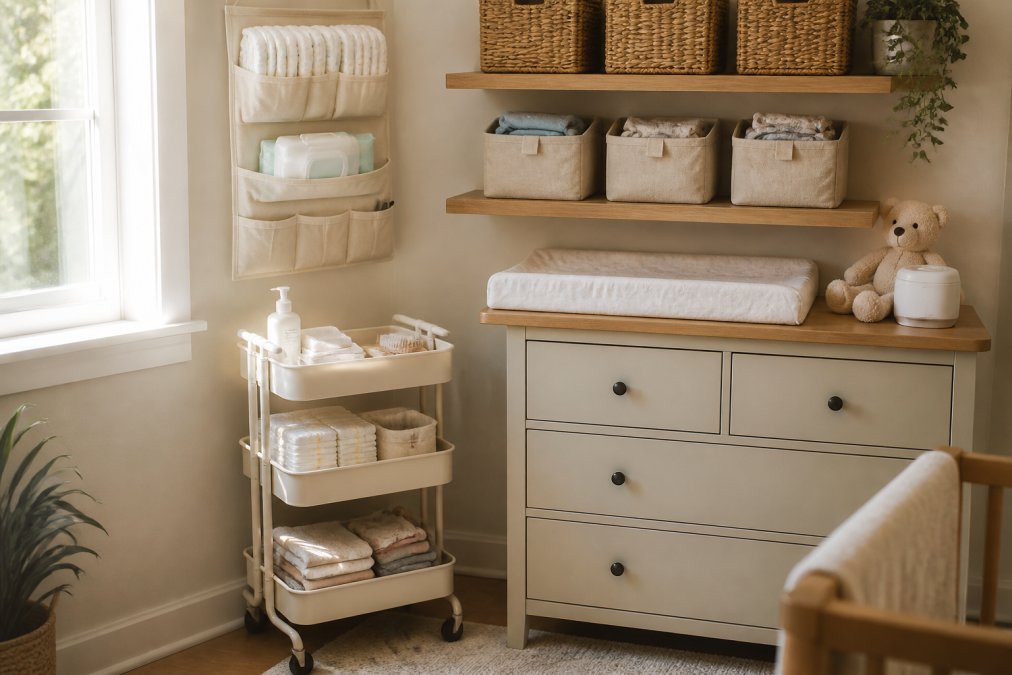
Door-Mounted Organisers and Wall Pockets
An over-the-door organiser holds nappies, wipes, creams, and small toys within instant reach. Wall-mounted fabric pockets work similarly, particularly useful above the changing table. Pegboards are flexible and look intentional; hang baskets on pegs to create custom storage matching your actual needs.
Rolling Carts and Mobile Storage
A rolling cart with three tiers holds nappy supplies, clothing, and toys on different levels. Wheel it to the changing table, then roll it back into the closet. Look for carts with removable baskets so you can pre-stage supplies for different situations. For very small nurseries, a slim two-tier cart fits in corners without being obtrusive.
Baby Clothes Storage Solutions
Baby clothes multiply quickly through multiple size stages in the first year. The real challenge is organising in a way that adapts as your baby grows.
Sorting Clothes by Size and Season
Sort ruthlessly before organising: current-size clothes, clothes for the next two to three months, outgrown clothes, and seasonal items. Only current-size clothes belong in your daily-access closet. Label storage boxes with size and season ("Newborn, Winter") and include the date packed. Future you will be grateful, and a second child means you'll know exactly what you have.
The Size-Stage Transition System
Plan your storage around size stages your baby moves through: newborn, 0-3 months, 3-6 months, and 6-12 months (peer-reviewed research). Use a tiered approach: keep current-size clothes in most accessible storage (lower closet shelves, top drawers), next-size clothes in secondary storage (higher shelves), and beyond that in tertiary storage outside the nursery. As your baby grows, rotate the tiers rather than reorganising everything at once.
Drawer Dividers and Size-Specific Organisation
Drawer dividers transform a jumble into an organised system. Separate socks, vests, sleepsuits, and other items by category. Organise by garment type rather than outfit so you know when supplies run low. Soft storage bins in drawers keep items grouped and prevent smaller pieces from sliding around. Label each bin clearly.
Vertical Hanging Storage for Size Progression
Use two hanging rails if possible: one at adult height for current-size clothes, one lower for clothes your baby will grow into. Alternatively, use hanging organisers with pockets for each size stage. As your baby grows, shift to the next pocket. Hanging garment bags protect off-season sizes; label them clearly so you know what's inside.
Managing Outgrown Clothes
Create a designated box for outgrown clothes immediately. Decide what to do with them before they accumulate: keeping for a second child, selling, or donating. If keeping them, pack in clearly labelled boxes stored outside the nursery with the date and a brief inventory. Process donations or sales within a month to prevent indefinite storage.
Seasonal Rotation Without Chaos
Rotate seasonal clothes in spring and autumn without overhauling the entire nursery. Pack away winter sleepsuits and cardigans in spring; pack away summer clothes in autumn. Label boxes with both size and season. Store seasonal clothes in a consistent location outside the nursery, under stairs, a spare cupboard, or the loft. A simple note listing what's stored where saves hours of searching.
Inventory Tracking for Small Spaces
Create a simple inventory system to avoid buying clothes you already have. Photograph your organised closet and drawers, noting what's stored where and quantities. When shopping, check your inventory first. You might think your baby needs more sleepsuits, but if you already have eight, you probably don't. This discipline prevents overwhelm and saves money.
Changing Station and Diaper Organisation
Your changing station is the most-used workspace in the nursery. Organisation here is essential for safety and sanity.
The Three-Zone Layout
Think of your changing station in three zones. The immediate zone (within arm's reach without moving hands from the baby) holds only what you need during an active nappy change: nappies, wipes, and nappy cream. A caddy, wall-mounted organiser, or shelf directly above works here. The secondary zone (one step away) holds backup supplies and items needed immediately after the change: clean clothes, muslin cloth, thermometer. A rolling cart or nearby shelf works perfectly. The tertiary zone (the rest of the nursery) stores everything else: spare nappy packs, seasonal clothes, toys.
Nappy and Wipes Management
Keep only one open pack of nappies on your changing station. When half-empty, open the backup pack and move it into the immediate zone. Store wipes in a lidded container to keep them moist. Position the wipes container so you can access it one-handed. Rotate stock systematically, using older nappies first to prevent waste.
Nappy Cream and Skincare Storage
Keep nappy cream and barrier creams in a small container within the immediate zone. Store backups elsewhere. If your baby uses multiple products, use a divided organiser and label each product clearly to prevent grabbing the wrong cream during a rushed change.
Dirty Nappy and Soiled Clothing Management
Designate a lidded bin for dirty nappies within one step of the changing station. Empty it daily to prevent odours. Use a separate small basket for soiled clothing that needs rinsing or soaking before the laundry hamper. Consider a nappy disposal system with odour-locking technology, or use a standard lidded bin with regular emptying.
Accessibility and Safety During Changes
Everything in your immediate zone should be accessible without reaching across your baby or leaning away. Keep the changing surface itself clear except during active use. If using a changing table with built-in storage, use drawers deliberately: top drawer for nappies and wipes, second drawer for creams, lower shelves for backups.
Contingency Planning
Keep a small emergency kit at your changing station: extra nappies for blowouts, extra wipes, and a change of clothes for your baby. If you change your baby in multiple locations, keep a portable caddy pre-packed with essentials. Store nappies and wipes in your changing bag, car, and other regular locations.
Safety-First Storage Anchoring
Any tall storage unit must be anchored to the wall to prevent tipping. Babies and toddlers climb and pull. Use appropriate wall anchors for your wall type; plasterboard needs different anchors than brick. Check anchoring monthly. Keep heavy items low and light items high. Don't store anything on top of tall units.

Budget-Friendly DIY Storage Hacks
Clear plastic storage boxes work everywhere and cost very little. Label and stack them for organised storage. Repurpose old baskets, wooden crates, or clean containers. Spray-paint wooden crates and add labels. Tension rods create shelf dividers inexpensively. Over-the-door organisers are affordable and surprisingly effective. Magazine holders turned sideways create vertical file storage for rolled blankets or flat items.
Long-Term Scalability and Inventory Management
Choose storage units that adapt as your child grows. The ZONEKIZ Storage Unit works for nappies and tiny clothes now, but in two years holds toys and books. Neutral colours and simple designs last longer than trendy options. Create a simple inventory system by photographing your organised spaces and noting what's stored where. Rotate seasonal items systematically when seasons change. As your child grows, their storage needs evolve from nappy storage to clothing storage to toy storage. Plan your system with this evolution in mind.
Organising small nursery storage feels overwhelming until you break it into pieces. Start by assessing your space and prioritising ruthlessly. Build systems, vertical storage, dividers, mobile carts, that work with your actual nursery dimensions. The Nook and Nurture Company offers storage solutions like the ZONEKIZ Storage Unit and Portable Baby Crib Storage Bag that grow with your child and adapt to your changing needs. Get started with systems that work now and scale as your family does.

Frequently Asked Questions
How can I maximize storage in a small nursery without making it feel cramped?
Use vertical space with wall-mounted organisers, hanging rails, and tall shelving units. Choose storage solutions with clean lines and neutral colours to avoid visual clutter. Multi-functional furniture like changing tables with built-in storage works well. The ZONEKIZ Storage Unit with 9 removable baskets (£49.99) fits efficiently into corners and uses vertical height rather than floor space, helping you store more whilst keeping the room feeling open.
What are the best space-saving ideas for organising baby clothes?
Sort clothes by size rather than age, since babies grow quickly. Use drawer dividers to prevent clothes from shifting and maximise drawer space. Hang frequently used items on a small rail, and store off-season clothes in labelled storage bins. Keep only what fits your baby now, and store next-size items elsewhere. This approach prevents overstuffing drawers and makes getting dressed faster.
How do I keep nappies and wipes easily accessible during night changes?
Place a Portable Baby Crib Storage Bag (£14.99) on your changing table or hang it from the cot headboard. This keeps nappies, wipes, and essentials within arm's reach during night-time changes. Alternatively, use a small rolling cart beside the changing station with everything you need on one shelf. Organise items by frequency of use, with the most-used items at eye level.
What safety considerations should I keep in mind when anchoring nursery storage?
Secure tall storage units and shelving to the wall using appropriate brackets and fixings to prevent tipping if your child climbs. Keep heavy items on lower shelves and lighter items on higher shelves. Avoid storing anything toxic or sharp within reach. Check that storage baskets have no sharp edges, and ensure cords from hanging organisers are kept out of reach to prevent strangulation hazards.
This article was written using GrandRanker


